

TailwindCSS: The Very Basics (Installation + IntelliSense)
I push myself to learn more about Javascript and web technologies in general every single day. Right now, I'm on a mission to truly understand Javascript fundamentals as well as do a deep dive on CSS. Despite already being a full-time software engineer, I feel there are still far too many gaps in my knowledge, and the projects surrounding this blog will be the catalyst in pushing me as far as possible in my career and learning in general.
Introduction
You've finally done it. You've sat down, created a fresh new project, and are ready to get going with that snazzy, new, utility-first CSS framework called Tailwind. However, you're not sure where to start, or maybe you've gotten started and you can't get IntelliSense to work in VS Code. This post will take you from creating a completely new project to having TailwindCSS installed with IntelliSense up and running in Visual Studio Code in just a few easy steps.
Step 1 (or so) - yarn initialization
Navigate to your folder of choice to begin your project (or where you've already started it, though for this guide we will assume you have yet to start).
Now, create a folder with your project name or simply type:
mkdir tailwind-beginner-blog
(be sure to change the name to whatever you want!)
Next, we're going to initialize yarn, which will give us a package.json file and the ability to install TailwindCSS. You can alternatively use npm and most of the same commands will apply.
Navigate to your project folder in your terminal and initialize yarn:
cd tailwind-beginner-blog
yarn init -y
Note: The
-yflag will answer yes to the default configuration questions from yarn. If you want more customization, simply typeyarn init!
Congrats! You've now initialized yarn and can install TailwindCSS. Let's get right to it!
Step 2 - TailwindCSS Installation
For this step, simply run:
yarn add tailwindcss
You can open your package.json after running this command, and you should see tailwindcss under your dependencies:
{
  "name": "tailwind-beginner-blog",
  "version": "1.0.0",
  "main": "index.js",
  "license": "MIT",
  "dependencies": {
    "tailwindcss": "^1.6.2"
  }
}
Next, we need to set up a CSS file for our project. Create a new CSS file in your project and name it whatever you want. Mine will be index.css. Then, in that file, include these three Tailwind directives:
@tailwind base;
@tailwind components;
@tailwind utilities;
When Tailwind is built, these directives will be swapped out with CSS that Tailwind itself generates.
Congrats! You've now installed TailwindCSS. If you were to excitedly run over to your HTML and start throwing Tailwind classes into your class attribute though, you'd be a little disappointed. We've still got just a little more to go.
Step 3 - Adding a Tailwind Configuration File
This step is easy (just like most of this, hopefully). Go to your terminal in your project's root directory, and run this command:
npx tailwindcss init
If all goes well, you'll see a new tailwind.config.js file pop up in your project. This file will contain some empty configuration exports for Tailwind:
module.exports = {
  purge: [],
  theme: {
    extend: {},
  },
  variants: {},
  plugins: [],
}
Step 4 - Processing and Building Tailwind
One of the requirements of such a unique framework like Tailwind is that it requires a build process where CSS files are processed and Tailwind's CSS is inserted. For this, we're going to use PostCSS, which is also what Tailwind's own documentation recommends. In addition to this, we'll use autoprefixer, which adds vendor-specific prefixes to your CSS.
Head on over to your terminal again, and politely ask yarn to install these two plugins:
yarn add postcss-cli autoprefixer
Note: As before, you can go check your
package.jsonto see if these packages installed properly!
Step 5 - PostCSS Configuration (and first build!)
We're almost there! Shortly, you'll be able to start writing TailwindCSS to your heart's content.
In your project's root directory, create a new file named postcss.config.js, open it, and add this:
module.exports = {
    plugins: [
        require('tailwindcss'),
        require('autoprefixer'),
    ]
}
This is telling PostCSS that it should process the CSS in our project with Tailwind, and then use autoprefixer to apply all the necessary vendor prefixes.
For the first time, we'll now be editing package.json ourselves. To make sure we're on the same page, this is what my package.json looks like at this point in the guide:
{
  "name": "tailwind-beginner-blog",
  "version": "1.0.0",
  "main": "index.js",
  "license": "MIT",
  "dependencies": {
    "autoprefixer": "^9.8.6",
    "postcss-cli": "^7.1.1",
    "tailwindcss": "^1.6.2"
  }
}
Under the ending brace of "dependencies", add this:
"scripts": {
    "build": "postcss index.css -o build/index.css"
  }
Note: Be sure to substitute with the name of your CSS file! If your file is in a subfolder, make sure to indicate that as well, such as
styles/index.css.
Finally, your package.json should now look like this:
{
  "name": "tailwind-beginner-blog",
  "version": "1.0.0",
  "main": "index.js",
  "license": "MIT",
  "dependencies": {
    "autoprefixer": "^9.8.6",
    "postcss-cli": "^7.1.1",
    "tailwindcss": "^1.6.2"
  },
  "scripts": {
    "build": "postcss index.css -o build/index.css"
  }
}
What we've done is add a yarn script called build, that tells postcss to process our index.css file and send the output to the build subfolder in a CSS file of the same name. Now, open your terminal and run yarn build. You should see some output similar to this:
➜  tailwind-beginner-blog yarn build
yarn run v1.19.1
$ postcss index.css -o build/index.css
✨  Done in 3.16s.
Congrats! Your CSS has been processed with Tailwind. Now, if only we had a way to see that...
Step 6 - index.html Creation and Viewing Our CSS!
Almost there, I promise. In your project, create an HTML file (which I've named index.html here). Open that file, and type html:5. You should see a dropdown come up that has an html:5 option, which if you select it should display a box labeled Emmet Abbreviation. Hit enter, and you'll have the skeleton of a new HTML page:
<!DOCTYPE html>
<html lang="en">
<head>
    <meta charset="UTF-8">
    <meta name="viewport" content="width=device-width, initial-scale=1.0">
    <title>Document</title>
</head>
<body>

</body>
</html>
Note: If the Emmet Abbreviation didn't work for you, just copy this HTML!
Inside the <head> tag, we need to add a link to our stylesheet (the <link> in the following snippet):
<head>
    <meta charset="UTF-8">
    <meta name="viewport" content="width=device-width, initial-scale=1.0">
    <title>Document</title>
    <link rel="stylesheet" href="build/index.css">
</head>
Now, inside the <body> tag, insert this:
<div>Hello!</div>
This is the div where we'll see our TailwindCSS at work. Write out your first ever TailwindCSS class by adding a class with TailwindCSS classes inside it to your HTML:
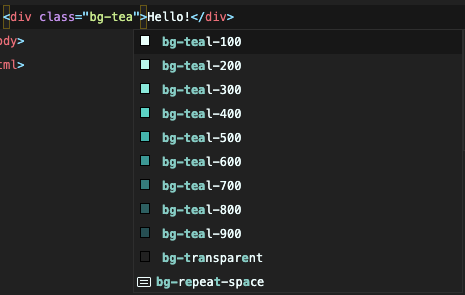
<div class="bg-teal-400">Hello!</div>
Now open that file in your favorite web browser, and you should see this:

If you do, your TailwindCSS is in action! If you don't, take a few steps back and see if you can figure out where things went wrong.
For the final piece, let's get some help from Visual Studio Code with writing our TailwindCSS.
Final Step - Tailwind CSS IntelliSense!
In VS Code, open your Extensions and search for Tailwind CSS IntelliSense. Install it, then either restart VS Code or run >Developer: Reload Window in the VS Code command palette. After you've done this, open your HTML file again, and start adding another Tailwind class. You should see IntelliSense recommendations from VS Code, like this:
You're finally done! You're now up and running with TailwindCSS with IntelliSense. These steps should apply to most other projects, so once you have a handle on what we've gone over here, you'll be able to quickly and easily integrate Tailwind in many other projects (such as React, Vue, and so on). To continue learning about Tailwind, check out their official documentation!
Thanks for reading, and have fun with your new CSS framework!
Note: You can view the completed project in this repo: https://github.com/sRobDev/tailwind-beginner-blog


